- Home page
- QMK calibration lexicon
QMK calibration lexicon
This calibration dictionary is designed to simplify your daily work process and make it more effective.
Everything about calibration - from A to Z
Calibration is a very sensitive issue. The data from a measurement must always be reliable and accurate. It is therefore important to regularly calibrate the numerous measuring devices, measuring systems, complete systems and measuring processes available on the market. As in all other specialist areas, the field of calibration also has its own terminology/specialist language.
Adjustment/adjustment:
Calibration/adjustment is the adjustment to the smallest possible deviation from the correct value. Calibration/adjustment requires intervention on the measuring device.
Deviation/measurement deviation:
Difference between the measurement result and the correct value of the measured variable (measurement result minus correct value); because a true value cannot be determined, a correct value is used in practice.
Accreditation (calibration):
Accreditation is the formal recognition of the competence of a calibration laboratory to carry out certain calibrations in accordance with specified standards (DKD/DAkkS guidelines). This formal determination is made by an authorized body. In Germany, this is the German Accreditation Body in Berlin.
Accreditations according to EN 45001:
EN 45001 is a European standard that defines the quality standards for calibration laboratories. After there were repeated problems in the recognition between calibrations according to EN 45001 and calibrations according to ISO Guide 25, a harmonized standard was created in 1999: DIN EN ISO 17025.
Accreditations according to ISO Guide 25:
ISO Guide 25 is the American standard that defines the quality standards for calibration laboratories (see point A.4 above).
Accreditations according to DIN EN ISO/IEC 17025:
DIN EN ISO/IEC 17025 is a common standard for verifying the competence of testing and calibration laboratories whose calibrations are recognized worldwide. In Germany, this is referred to as DAkkS accreditation, in Switzerland as SCS and in Austria as ÖKD.
Aging:
The ageing is the permitted drift that the measuring device could make until the next calibration. This value is an empirical value that is determined over a longer period of time.
Adjustment time:
The adjustment time is the time that a sensor (probe or sensor element) needs until it has adjusted to the measured variable (e.g. temperature). The adjustment time is the time that test equipment needs to adjust to the specified ambient conditions
(e.g. dimensional test equipment).
Contact pressure:
For example, the contact pressure is the force with which surface sensors are pressed onto the temperature-controlled surface during calibration. A certain amount of pressure should be applied so that there is no air gap between the surface and the contact surface of the sensor.
Another example is the force with which the blades of a caliper are pressed together to take a measurement. The force can vary depending on the user.
Resolution:
Smallest distinguishable difference between two displays of a display device. In the case of a digital display, this is the change in the display where the last significant digit changes by one digit step. Attention: The resolution of a measuring device is not the same as its accuracy! The accuracy of a measuring device is always worse than its resolution.
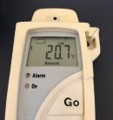
Measured/display value: 20.7°C
Resolution: 0.1°C
Accuracy: ?
Transducer/transducer/sensor:
Element of a measuring device or measuring chain on which the measured variable acts directly (also sensor, sensor element or transducer), e.g: – Measuring point/sensor of an electrical thermometer
– Impeller of an impeller anemometer
– Float of a liquid level indicator.
Authorized personnel:
Element of a measuring device or measuring chain on which the measured variable acts directly (also sensor, sensor element or transducer), e.g: – Measuring point/sensor of an electrical thermometer
– Impeller of an impeller anemometer
– Float of a liquid level indicator.
Base unit:
Unit of a base size in a size system.
Base size:
One of the quantities of a system of quantities that is considered independent of the other quantities due to an agreement (e.g. length, mass, time…).
Appraisal:
Examination of an object (organization, system, procedure, activity, conditions, material, etc.) to assess its compliance with certain requirements; assessment in the context of accreditation or certification: examinations in the form of an audit and expert opinion regarding the fulfillment of the requirements specified for accreditation.
Condition test/visual inspection:
Before a calibration, check whether everything is in order on the measuring device or measuring system or whether there is any visible damage (e.g. bent sensor due to transportation, damage to the housing/display, broken pointer of a pressure gauge, etc.). If this is the case, the measuring device
or measuring system cannot be calibrated.
Operating resources:
Collective term for personnel and material resources (premises, equipment, auxiliary materials and reagents, consumables, raw materials, containers & accessories, packaging materials & intermediate products) that are used to manufacture and control products.
Reference standard:
Normal, generally of the highest accuracy available at a given location or organization from which measurements are derived.
Reference value/reference value:
The value that is represented by a reference measuring device or a reference measuring device and with which the display value of the measuring device to be tested (test item or calibration item) is compared. The reference value is also called the target value, correct value, best estimate, assigned value or agreed value.
DAkkS calibration certificate:
The term “DAkkS calibration certificate” is used colloquially for the calibration certificate with the accreditation symbol of an accredited calibration.
Calibration certificates with the accreditation symbol represent the highest industrial calibration standard in Germany. They have the highest reliability, are internationally recognized and are binding in court. Calibration certificates with an accreditation symbol are ideal for:
- Factory standards
- the automotive industry (IATF)
- Pharmacy/medical technology
- Experts
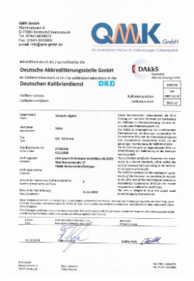
Sample of a calibration certificate with accreditation symbol
DCC digital calibration certificate:
The digital calibration certificate (DCC) is a digital certificate that documents the results of calibrations and was developed by the Physikalisch-Technische Bundesanstalt (PTB) and the German Calibration Service (DKD). It replaces traditional paper-based calibration certificates and offers several advantages, including increased accuracy, efficiency and security. Here is a summary of the most important points:
What is a digital calibration certificate (DCC)?
A DCC is a digital document that contains the measurement results and other relevant information of a calibration. It serves as an official certificate that confirms the accuracy and traceability of measuring devices. PTB and the DKD are working on the standardization and dissemination of the DCC to support the transition from paper-based to digital processes.
Advantages of the DCC
- Automation and efficiency: DCCs enable automated processing and storage of calibration data, which reduces administrative effort and increases efficiency.
- Accuracy and integrity: Digital data transmission and storage minimize the risk of errors and manipulation. Electronic signatures and encryption techniques ensure the authenticity and integrity of the data.
- Environmentally friendly: By dispensing with paper documents, the DCC helps to reduce paper consumption and thus conserve resources.
- Traceability and transparency: DCCs can be easily archived and retrieved when required, improving the traceability of measuring devices and calibration processes.
Technical details and implementation
- Standardization: The PTB and the DKD are developing uniform standards for the DCC to ensure compatibility and acceptance.
- Security measures: The use of electronic signatures and encryption technologies ensures that data is protected against unauthorized access and manipulation.
- Data formats: The DCC uses standardized data formats (such as XML) that enable easy integration into existing IT systems and databases.
Challenges and future prospects
- Acceptance and dissemination: The introduction of the DCC requires acceptance by users and calibration laboratories. Training and information campaigns are necessary to communicate the benefits and use of the DCC.
- Interoperability: Ensuring interoperability between different systems and platforms is a challenge that is being tackled through international cooperation and standardization.
- Technological development: The DCC must be continuously developed to meet the latest technological and regulatory requirements.
Conclusion
The digital calibration certificate (DCC) of the PTB and the DKD represents an important step towards digitalization and automation in the field of measurement technology. It offers numerous advantages in terms of efficiency, accuracy and environmental friendliness, while at the same time having to overcome the challenges of acceptance and interoperability. The ongoing development and standardization of the DCC will have a significant influence on the future of calibration.
German Accreditation Body (DAkkS):
The DAkkS is Germany’s national accreditation body. In accordance with Regulation (EC) No. 765/2008 and the Accreditation Body Act (AkkStelleG), it acts in the public interest as the sole service provider for accreditation in Germany.

DAkkS logo
Tasks of the DAkkS:
The accreditation of conformity assessment bodies (laboratories, inspection and certification bodies) is the legal mandate of DAkkS. With an accreditation, the DAkkS confirms that these bodies fulfill their tasks competently and in accordance with applicable requirements. In short: DAkkS audits the auditors.
Confirming competence, ensuring quality, creating trust: By establishing a national accreditation body, Germany has an accreditation system that is transparent for manufacturers, consumers and conformity assessment bodies. The DAkkS offers accreditations for all areas of conformity assessment from a single source. The accreditation procedure creates confidence in the results of certificates, test reports and inspections and supports their worldwide recognition and comparability. DAkkS thus makes an important contribution to the quality assurance of products and services, to consumer protection and to the competitiveness of the German economy.
German Calibration Service (DKD):
Reorganization since May 2011 as a PTB committee for the development of metrological principles for calibrations.
Tasks and objectives of the DKD:
Ensuring the cooperation of accredited calibration laboratories with PTB, development of calibration guidelines (DKD-R), basis for accreditation procedures and assessments, promotion of the calibration system in the sense of passing on the unit, promotion of the exchange of information between the members.
Digit:
The smallest possible resolution of the actual value of a digital measuring device.
DIN standard:
DIN standards are published by the German Institute for Standardization. They are created in close cooperation between companies, associations and authorities.
DIN standards can have a national, European and international character, which can be recognized by the designations:
DIN + counting number: A DIN + counting number (e.g. DIN 5008) is a national standard.
DIN EN + number: A DIN EN + number (e.g. DIN EN 45001) is the German version of a European standard.
DIN EN ISO + counting number: A DIN EN ISO + counting number (e.g. DIN EN ISO/IEC 17025) is the German edition of a European standard which is identical to an international standard.
IEC stands for International Electronical Commission; international standardization body under private law for standardization in the field of electrical engineering and electronics.
Documentation:
During the
calibration
is the documentation of the measured values during calibration.
calibration
and the creation of the certificate.
Drift:
Slow change of a metrological characteristic of a measuring device.
Oaks:
Verification is the official check for compliance with the verification error limits. Calibration is carried out exclusively by the State Weights and Measures Office. Only those measuring devices that have a type approval are eligible for calibration.
Calibration mark/verification mark:
A calibration mark is affixed to the measuring device and sensor, indicating the period of validity of the calibration. This means that if the “expiry date” is exceeded, the calibration is no longer valid and must be carried out again. The statement of a validity date is available for the
calibration
does not exist! Only a recommendation may be made here (see “Recalibration”).
Calibration certificate:
The verification office documents the period of validity of the test in the verification certificate.

Calibration certificate
This time period is also printed on the calibration mark on the measuring device and sensor.
Suitability test (of a testing laboratory):
Determination of the performance of a testing laboratory, certain
to carry out tests or types of tests.
Suitability test:
The suitability test depends on the type of test characteristics. Necessary prerequisites for the tests are the resolution of the test equipment and its linearity in the measuring range of the test characteristic.
Basically, test equipment is differentiated according to the type of characteristics. There is test equipment for quantitative and qualitative characteristics. While the qualitative characteristics are usually determined using gauges or measuring standards, the quantitative characteristics are determined using indicating test equipment. The characteristics of the features are quantified and compared with quality specifications.
All test equipment for quantitative characteristics obtained through quantitative observations of the measurements can in principle be subjected to the suitability test. Test equipment for quantitative characteristics is divided into two groups:
- Test equipment designed for the measurement of individual characteristics
- Test equipment that records several characteristics simultaneously
Within the groups, a distinction is made between standard test equipment, such as multimeters, which can be used to measure different measuring ranges, and special test equipment, which is usually developed for a specific application or for special characteristics and used accordingly.
Suitability test for a characteristic:
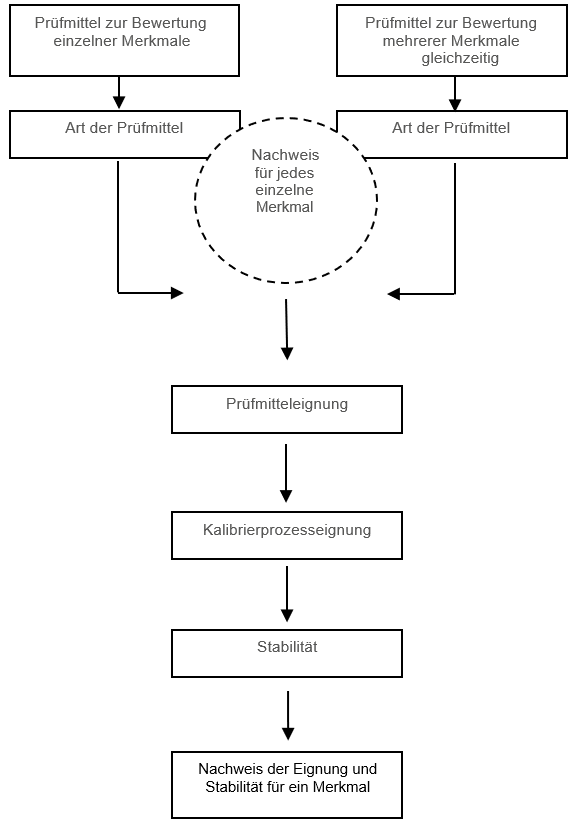
Basic scheme of the suitability test:
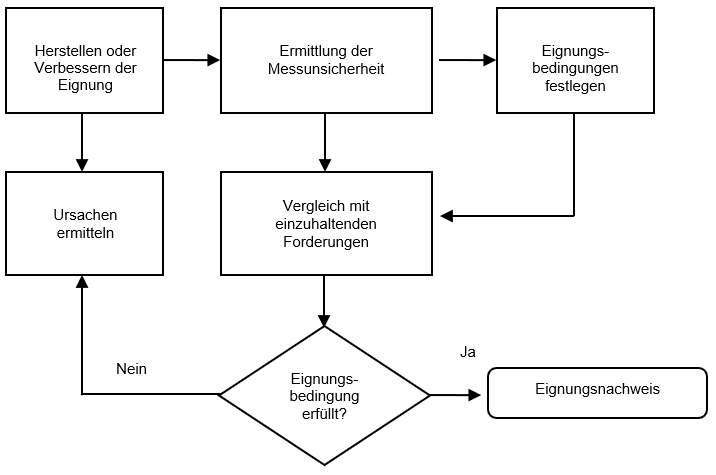
Influencesideration:
Quantity that is not a measured variable but influences the measurement result, e.g:
- Temperature of a micrometer for length measurement
- Frequency when measuring the amplitude of an alternating voltage
- Local ambient pressure when measuring flow velocities
Unit:
Specific quantity defined by agreement to which other quantities of the same type are compared in order to express the relationship to this quantity. For units in metrology, names and unit symbols are defined by agreement.
Unit (derived):
Unit of a derived quantity in a system of quantities, e.g:
|
Name of the measured variable |
Unit of the measured variable |
Sign |
|
Power Energy Pressure |
Newton Joule Pascal |
N J Pa |
Unit (multiple):
The multiple of a unit is a larger unit that is formed from a unit by an agreed ratio. A distinction is made between decimal and non-decimal multiples.
a decimal multiple of the meter is the kilometer
a non-decimal multiple of the second is the hour
Unit (part):
The part of a unit is a smaller unit that is formed from a unit by an agreed ratio. A distinction is made between the decimal and the non-decimal part.
a decimal part of the meter is the millimeter
System of units:
Set of base units and derived units that are defined according to predefined rules for a given system of units (SI system of units).
System of units (international), SI system of units:
The system of units adopted and recommended by the General Conference on Weights and Measures (CGPM).
|
||||||||||||||||||||||||||||
Unit symbol:
Agreed symbol that stands for a unit (e.g. “m” for meter, “A” for ampere, “°C” for temperature …).
emissivity:
The ability of a material/body to emit (emit) infrared radiation; this quantity can take a value between 0 and 1.
Sensitivity:
Change in the output variable of a measuring device divided by the corresponding change in the input variable.
European Cooperation for Accreditation of Laboratories (EA):
Today, international coordination in metrology is carried out by numerous committees whose members come from the national coordination centers. These national bodies, often state institutes, then initiate and monitor implementation in their own country. In Europe, for example, the European coorperation for accreditation of laboratories (EA) acts as a link between the national state institutes.
Examples of national state institutions:
The Physikalisch-Technische Bundesanstalt (PTB) is the supreme authority for metrology in Germany.
The central office for the measurement system in Austria is the Federal Office for Economic Affairs (BmwA). The laboratories are accredited by the Austrian Calibration Service (ÖKD).
Switzerland’s national metering system is under the supervision of the Federal Office of Metrology (FOM). All accredited laboratories are members of the Swiss Accreditation Service (SCS).
Sensor:
The sensor (also sensor, sensor element or transducer) is attached/integrated to the sensor itself and is directly affected by the measured variable.
- NTC sensor in the probe for air temperature measurement
- Thermocouple in the cross-band surface sensor
- DMS in the pressure probe
Function test:
As with the quality test, the following is carried out before a
calibration
it is checked whether the measuring device or measuring system is functional (e.g. whether all segments of the digital display are in order, whether the device under test delivers meaningful and comprehensible values after being switched on, etc.). If this is not the case, the measuring device or measuring system cannot be calibrated.
Normal use:
Standard that is routinely used to calibrate or test measuring standards, measuring instruments or reference materials;
A working standard is usually calibrated with the aid of a reference standard;
A working standard that is routinely used to ensure that measurements are carried out correctly is called a test standard.
Accuracy:
Ability of a measuring device to deliver values of the output variable close to the correct value; accuracy is the same as measurement uncertainty; only formulated positively. The term accuracy is used in the manufacturer’s specifications of the measuring devices. This “positive” term is also necessary and understandable from an advertising point of view. For calibration results, however, the “negative” term measurement uncertainty is used.
Accuracy class:
Measuring device class that fulfills metrological requirements according to which measurement deviations should remain within defined limits.
Device specification:
The detailed technical data and descriptions of a specific device; this includes the construction plans, parts lists with manufacturer specifications, functional descriptions, performance specifications, maintenance specifications,
calibration
repair, etc. A current device specification is an integral part of the device.
Limit conditions:
Extreme conditions which a measuring instrument must withstand without damage and without deterioration of its specified metrological characteristics in a subsequent application under operating conditions;
The limiting conditions for storage, transportation and operation may vary.
Limit conditions can include limit values for the measured variable and for the influencing variables.
Guide to the Expression of Uncertainty in Measurement (GUM):
The “GUM” is a guideline for specifying measurement uncertainties when measuring, which was adopted in 1993. This guide can be obtained from DIN. Various institutions have derived simplified and procedure-oriented guidelines from this. For example, the EA-R2 has published the German translation of the DKD-3 (specification of measurement uncertainty for calibrations) from 1998.
History:
By regularly calibrating a measuring device, you can see from the individual certificates how the values have changed in the past.
Homogeneity:
Specification of the parameter via the spatial distribution in the calibration device
Hysteresis:
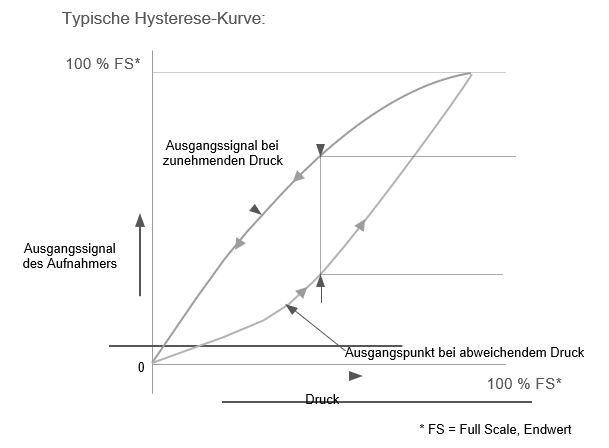
The hysteresis is relevant for pressure calibrations of electrical and mechanical pressure measuring systems. It is calculated from the results of the measurements with rising and falling pressure, from the difference between the displayed values. This difference is included in the measurement uncertainty analysis.
Identification:
In order to prevent confusion and to provide proof that the
calibration
calibration, a test equipment must be
calibration
clearly identified after calibration. This means that the device and sensor are given a calibration mark with a unique number and the date of calibration.
calibration
. This number and the date can then be found on all sheets of the corresponding certificate.
Identification also includes the clear marking of faulty measuring and test equipment as well as the marking of test aids.
Instability:
The instability expresses the measurement uncertainty of the test specimen during calibration. It is part of the total measurement uncertainty stated in the certificate.
International Laboratory Accreditation Cooperation (ILAC):
The main objective of the ILAC is to create a worldwide network of agreements for the mutual recognition of calibration and test certificates of accredited laboratories. This supports the work of relevant regional organizations (e.g. the EA). The first step in this direction is the common accreditation basis DIN EN ISO/IEC 17025.
ILAC logo
International standard:
Standard that is recognized by an international agreement as the basis for determining the values of all other standards of the quantity in question.
ISO/factory calibration certificate:
The quality assurance systems of industrial companies have been certified in accordance with DIN ISO 9000ff since 1987. There are also other industry-specific quality guidelines.
The introduction and maintenance of test equipment calibration and monitoring is required for all directives and standards.
In many cases, ISO calibrations that meet the requirements of the various standards and are traceable to national standards are sufficient. ISO certificates are then issued for these calibrations.
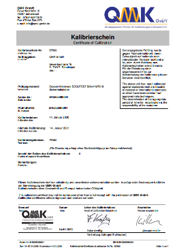
ISO certificate
ISO stands for:
International Organization for Standardization
Actual value:
The value of a measured variable displayed by the calibration item; it usually differs – due to measurement errors – from the correct value (see also target value), which is represented by a reference measuring device or a reference measuring device.
Calibration instructions:
Instructions describing exactly how and with which tools the calibration is to be carried out for employees who carry out the calibrations.

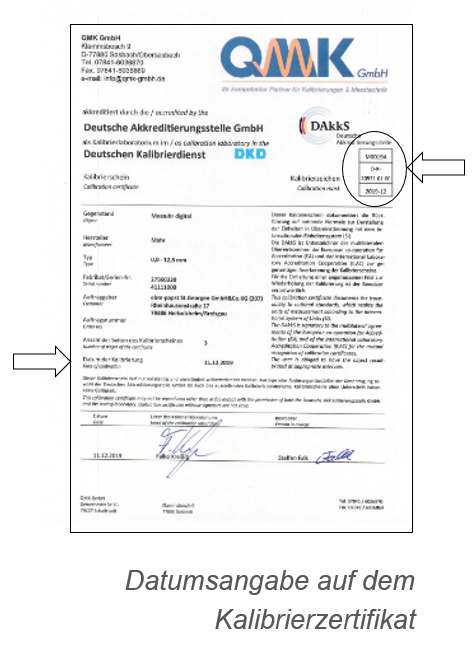
Date on the calibration mark
Calibration date:
Since, in contrast to calibration, there is no expiration date for calibration, the date on which the calibration was carried out is noted for each calibration (on the calibration mark for the measuring device/sensor, information in the calibration certificate).
It is not permitted to specify when the next calibration is due. Only a recommendation may be made in the accompanying letter. The frequency of the calibrations and the intervals between them are defined by the user (see also Calibration interval).
Calibration device:
In order to be able to carry out calibrations, you need various auxiliary measuring devices and equipment that provide the defined values (the correct values) on which you want to calibrate a measuring device (e.g. liquid basin for temperature calibration).
Calibrate:
Calibration is the comparison of a measured value with the correct value under specified conditions, the documentation of the deviation, the calculation of the measurement uncertainty and the creation of the certificate.
Calibration result:
The data collected during
calibration
The values documented during calibration and the values calculated from them (mean value, deviation, measurement uncertainty) are the main component of the calibration result and are documented in the certificate. A complete calibration result consists of reference value, actual value, deviation, tolerance and measurement uncertainty.
Calibration capability:
Before calibration, quality, visual and functional tests are carried out on the measuring devices to be calibrated.
calibration
the calibration capability is determined. If these tests reveal that something is wrong, the meter must not be calibrated. It is therefore not calibratable.
Calibration item/ test item:
Measuring device/equipment, sensor or measuring system that is to be calibrated (often also called test item).
Calibration interval/monitoring interval:
In order to achieve permanently correct measurements and to gain confidence in the test equipment required for this, it must be calibrated at regular intervals. These intervals from one calibration to the next are called calibration intervals or monitoring intervals. The length of this period can be determined individually by the user and depends, among other things, on
- Recommendation of calibration laboratories (normally “annually”)
- Specifications of the measuring device manufacturer
- required measurement uncertainties
- Specifications of standards and guidelines
- Specifications from third parties
- Operating conditions of the test equipment
- Frequency of use
The following procedure can be used to determine the calibration interval:

Calibration laboratory:
Laboratory that performs calibrations; this can be an external laboratory (e.g. calibration service provider) or an internal department within the company.
Calibration management:
Calibration management describes – within the life cycle of a measuring point – all measures for organization, risk management and cost control. All elements of calibration management are categorized into project phase, operating phase or common elements. Calibration management thus describes the holistic approach to organizing metrological instrumentation from a risk-based perspective.
Calibration mark:
Unique identification of a measuring device and its sensors after
calibration
The mark indicates (by stating the calibration date) when the last calibration was carried out.
calibration
took place.
In addition, the device and the sensor are given a unique number (which is also noted on the calibration mark) in order to clearly identify the measuring system and establish a clear connection to the correct certificate.


Examples of calibration marks
Calibration certificate:
The accredited calibration of a test device is documented in the calibration certificate. For this purpose, the device and sensor data as well as the data collected during the
calibration
measured values are recorded. It is also listed which laboratory
calibration
performed, which facilities,
procedures and reference devices were used and which environmental conditions were used for the
calibration
prevailed during calibration.
The calibration certificates issued by calibration laboratories document the condition of the calibration item during calibration.
calibration
. This does not indicate how long the documented measured values are valid. In order to be sure in the long term that the measured values are still correct and that the measuring device is still measuring correctly, the
calibration
must be repeated frequently enough (see also “Recalibration”).
Calibration procedure:
There are different methods for different measured variables to calibrate the
calibration
calibration. The calibration procedure depends on various factors (e.g. parameters, equipment, measurement uncertainty, etc.). The corresponding procedure with which the
calibration
was carried out is specified in the certificate.
Calibration value:
A complete calibration or measured value consists of several components: The reference value, the display value, the deviation and the measurement uncertainty:
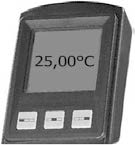
Reference value

Display value
-0.2 k ±0.3 k
Deviation and measurement uncertainty
Calibration certificate:
The calibration certificate documents the ISO/factory calibration of a test device. For this purpose, the device and sensor data as well as the data collected during the
calibration
measured values are recorded. It is also listed which laboratory
calibration
calibration, what equipment, procedures and reference devices were used and what environmental conditions were used for the calibration.
calibration
prevailed during the calibration.
The calibration certificates issued by calibration laboratories document the condition of the calibration item during calibration.
calibration
. This does not indicate how long the documented measured values are valid.

ISO calibration certificate
In order to be sure in the long term that the measured values are still correct and that the measuring device is still measuring correctly, the
calibration
must be repeated frequently enough (see also “Recalibration”).
Conformity/ Compliant with standards:
Fulfillment of specified standards and requirements; fulfills a
calibration
the requirement of a specific standard, the
calibration
or the resulting calibration certificate conforms to this standard.
Declaration of Conformity:
The declaration of conformity is a written confirmation at the end of a conformity assessment, with which the person responsible (e.g. manufacturer, distributor) for a product, the provision of a service or an organization (e.g. testing laboratory, operator of a quality management system) bindingly declares and confirms that the object (product, service, body, QMS) has the properties specified on the declaration. The properties are usually specified by specifying the standards that the object complies with.
Correction:
Value added algebraically to the uncorrected measurement result to compensate for the systematic measurement deviation. The correction is equal to the estimated systematic error of measurement with the opposite sign.
Correction factor:
Numerical factor by which the uncorrected measurement result is multiplied to compensate for the systematic measurement deviation.
Measurement scale:
Device with which one or more values of a quantity are to be reproduced or supplied in a constant manner during its use, e.g:
- Weight piece
- Normal resistance
- gauge block
Measurement deviation (systematic):
Mean value that would result from an unlimited number of measurements of the same measurand performed under repeatability conditions, minus one correct value of the measurand;
- Systematic measurement deviation is equal to measurement deviation minus random measurement deviation;
- Like the correct value, the systematic measurement deviation and its causes cannot be fully known.
Measurement deviation (random):
Measurement result minus the mean value that would result from an unlimited number of measurements of the same measurand carried out under repeat conditions;
- Random measurement deviation is equal to measurement deviation minus systematic measurement deviation;
- Because only a finite number of measurements can be carried out, only an estimate of the random measurement deviation can be determined.
Measurable size:
Property of a phenomenon, a body or a substance that can be described qualitatively and determined quantitatively; the term quantity can refer to a quantity in the general sense (length, time, mass, temperature, pressure, electrical resistance …), or to a specific quantity (length of a given rod, temperature of a given surface, electrical resistance of a given wire …). Quantities that can be ordered in relation to each other are called quantities of the same type. The formula symbols for sizes are defined in ISO 31.
Measuring range:
Value range of the measured variable for which the measurement deviations of a measuring device should lie within specified limits; the measurement deviation of a measuring device is determined in practice with reference to a correct value.
Measurement stability:
Ability of a measuring device to maintain its metrological properties unchanged over time.
Measuring device:
Complete set of measuring devices and other equipment assembled to perform specified measurements.
Measurement result:
Value assigned to a measurand and determined by measurements; it should be made clear what the measurement result refers to:
- the display
- the uncorrected measurement result
- the corrected measurement result
– and whether several values were determined. A complete specification of the measurement result contains information about the measurement uncertainty!
Measurement result (corrected):
Measurement result after correction for systematic measurement deviation.
Measurement result (uncorrected):
Measurement result before correction for systematic measurement deviation.
Measurement accuracy:
Extent of agreement between the measurement result and a correct value of the measured variable; accuracy is a qualitative term. The word “precision” should not be used for “accuracy”.
Measuring device:
Device to be used alone or in conjunction with additional equipment for measurements.
Measured variable:
Special quantity that is the subject of a measurement; the specification of a measured quantity may require information on quantities such as time, temperature and pressure.
Measured variable (derived):
A quantity defined in a system of quantities as a function of the basic quantities of this system; in a system with the basic quantities length and time, speed is a derived quantity, defined as length divided by time.
Measuring chain:
Sequence of elements of a measuring device or a measuring system that forms the path of the measurement signal from input to output.
Measurement method:
General description of the logical sequence of actions for carrying out measurements;
- Substitution method
- Differential measurement method
- Zero adjustment
Measuring equipment:
All measuring devices, standards, reference materials and aids required to carry out a measurement.
Measuring principle:
Scientific basis of a measurement method, e.g:
- the thermoelectric effect, applied to temperature measurements
- the Josephson effect, applied to measurements of electrical voltage
- the Doppler effect, applied to speed measurements
Measurement signal:
Quantity that represents the measured variable and to which it is linked by a function, e.g:
- the electrical output signal of a pressure transducer
- the frequency of a voltage-frequency converter
Transmitter:
Device that provides an output variable according to a fixed relationship to an input variable.
Measurement:
The entirety of activities for determining a quantity value; the activities can run automatically.
Measurement uncertainty:
Parameter assigned to the result that characterizes the scatter of the values that can be assigned to the measurand; or:
The estimated value for characterizing a value range within which the true value of the measured variable lies; there are many factors that influence the measurement uncertainty.
It is assumed that the measurement result is the best estimate of the value of the measurand and that all components of uncertainty contribute to the scatter, including those that are affected by systematic effects.
e.g. those originating from corrections and reference standards.
Measuring method:
The entirety of precisely described activities as they are applied when carrying out special measurements in accordance with a specified measurement method. It is common to write down a measurement procedure in a document called a measurement instruction, measurement rule or measurement procedure, which usually contains sufficient detail to enable the user to perform the measurement without further information.
Metrology:
The “Dart Game Declaration”:

You will never always hit the exact center when playing darts. Every now and then an arrow hits the bull’s-eye, but often you also hit the outside of the target. The darts that did not hit the bull’s eye then reflect the uncertainty of the thrower or the uncertainty of the dart player. The measurement uncertainty is influenced by the calibration item, the measuring equipment, the persons, the measuring method and the ambient conditions.
The science of measurement; metrology encompasses both the theoretical and practical aspects of measurements, regardless of the respective measurement uncertainty and regardless of the respective field of science and technology.
National standard:
Standard that is recognized in a country by national resolution as the basis for determining the values of all other standards of the size in question.
Nonlinearity:
The non-linearity is the deviation of the sensor’s output signal from a theoretical straight line that has been adjusted to the data points of an effective calibration. It represents the maximum deviation of all data points of a
effective calibration and is expressed as a percentage of the full output signal.
Normal/ Reference:
Measuring standard, measuring instrument, reference material or measuring device for the purpose of determining, embodying, preserving or reproducing a unit or one or more quantity values, e.g:
- 1 kg mass standard
- 100 Ohm resistance standard
- Caesium atomic clock
- Thread standard
Physikalisch-Technische Bundesanstalt (PTB):
The Physikalisch-Technische Bundesanstalt, Braunschweig and Berlin, is a scientific and engineering state institute and technical authority of the Federal Republic of Germany for metrology and physical safety engineering. PTB is part of the German Ministry of Economic Affairs.

Precision:
Statistical variable that describes the mean and random deviation of values obtained from multiple and uninterrupted repetitions of a measurement. For example, the statistical dispersion or standard deviation is used as a statistical variable. The precision gives an indication of random result uncertainties.
Primary laboratory:
The primary laboratory is the laboratory that works with standards of the highest quality and lowest measurement uncertainty. It refers to the highest traceability level.
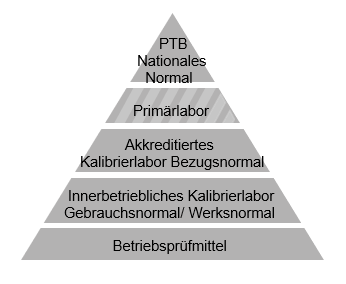
Primary normal:
Standard which, according to general judgment, meets the highest metrological requirements, with a magnitude value which is accepted independently of those of other standards for the same quantity.
Test equipment:
The measuring equipment used to check compliance with a quality requirement after the measuring process. The combination of measuring and testing for compliance with a quality requirement turns measuring equipment into testing equipment.
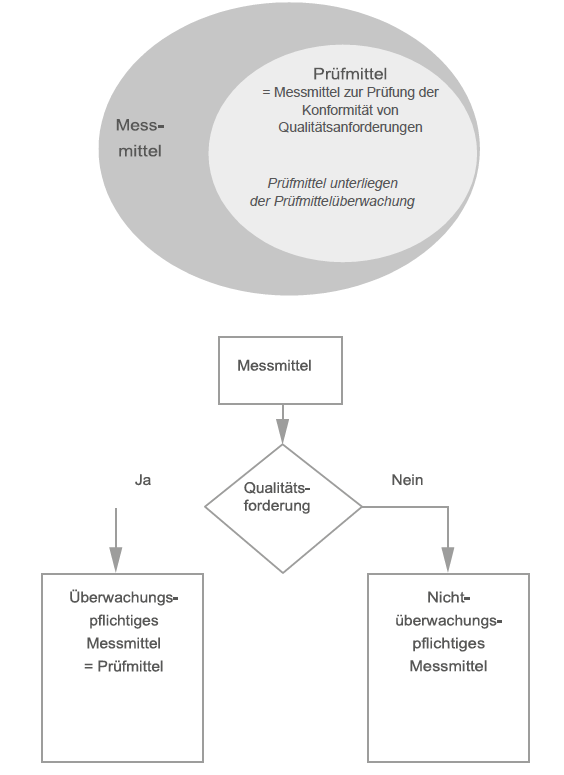
Test equipment, test process suitability/test equipment capability:
The result of the test is always subject to measurement uncertainty. According to the standards of the ISO 9000 family, the user of test processes must define the measurements to be performed and the required accuracy and select the test equipment that is suitable with regard to the required accuracy and measurement uncertainty.
In order to be able to assess suitability, the user must know the quality requirement (e.g. the tolerance), because a test process is suitable for quality testing if its measurement uncertainty is sufficiently small compared to the quality requirement. The ratio of measurement uncertainty to quality requirements is important wherever products or processes are qualified on the basis of individual characteristic values.
The measurement result is the symmetrical interval of the expanded measurement uncertainty. When comparing the measurement result with the specification limits, three ranges emerge:
- Range of conformity: Specification range reduced by the expanded measurement uncertainty
- Non-conformance range: Range outside the specification range extended by the expanded measurement uncertainty U
- Uncertainty range: range close to the specification limits for which neither agreement nor disagreement can be demonstrated, taking into account the expanded measurement uncertainty
Test equipment management/ test equipment management:
Test equipment management (also known as test equipment management, PMV) is part of quality management. It aims to ensure and maintain the quality, reliability, operational capability and readiness of a company’s test equipment. Monitoring should enable test equipment to provide the required performance at all times. Test equipment management is therefore a method for increasing process capability.
Quality:
- Quality is the totality of characteristics of a unit or a definable object with regard to its suitability to fulfill specified and presupposed requirements.
- Complete set of fulfilled requirements for characteristics of a unit.
- Realized condition of a unit with regard to quality requirements.
Definition 1 implies that the non-presupposed and non-specified properties have no further meaning as quality criteria. However, non-presupposed requirements can also determine quality.
Quality audit:
Regularly recurring, systematic and independent examination to determine whether the quality-related activities and related results meet the planned requirements and whether these activities are actually carried out and are suitable for achieving these objectives.
Quality management:
Management related to quality; coordinated activities for leading and directing an organization with regard to quality; quality management thus represents all activities of overall management that define the quality policy, objectives and responsibilities within the framework of the quality management system and implement these through means such as quality planning, quality control, quality assurance and quality improvement (see quality assurance according to ISO 9000 ff).
Quality management requires a system of operational management (organization and leadership, procedures, resources; quality management system) in order to implement the quality policy and fulfil the tasks of quality assurance and is superordinate to the organizational system of quality assurance.
quality management system:
Management system for guiding and directing an organization with regard to quality; management system: organizational structure, procedures, processes and means for defining and implementing the quality policy, the quality objectives and for achieving these objectives.
Quality plan:
Plan that defines the objectives for improvement as a result of the quality requirements and the organizational and operational plan for achieving these objectives; specification for the quality elements to be applied in the specified case.
Quality planning:
Part of quality management that focuses on defining the quality objectives and the necessary execution processes, as well as the associated resources to fulfill the quality objectives.
Quality policy:
An organization’s overarching intentions and direction on quality as formally expressed by top management.
Quality assurance:
The part of quality management and the quality management system that is aimed at creating confidence that quality requirements are and will be met; definition ISO 9000: All planned and systematic activities that are implemented within the quality management system and that are presented as necessary to create sufficient confidence that a unit will meet the quality requirements (unit: that which can be described and considered individually).
Goal of quality assurance:
The overriding objective of quality assurance is therefore to fulfill preventive and control measures to ensure that products and services are created in such a way that they are suitable for their intended use. Furthermore, that they meet the framework of the specified requirements in all respects and do not expose consumers to any risk due to questionable or inadequate quality or efficacy. This is particularly true for products in the healthcare industry.
Quality assurance thus describes the system of planned activities for planning, controlling and monitoring to fulfill customer requirements. This system must be organized and implemented in such a way that the requirements are met with a sufficient degree of confidence.
Confidence-building measures are thus put in place.
These activities are based on the intentions and objectives with regard to fulfilling the requirements.
Quality assurance therefore comprises all those planned and systematic measures that are necessary to ensure adequate confidence that a product or service meets the quality requirements. The presentation, for example, is a confidence-building measure.
quality assurance system:
A comprehensively planned and correctly implemented quality assurance system based on the quality policy and quality management of the company management; this system should be fully documented and its functionality monitored by the persons responsible for quality assurance.
Quality Assurance Agreement (QAA)
A quality assurance agreement (QAA) is a document that is agreed between two parties (e.g. customer and supplier) and defines the requirements for the quality of a product or service. The QAA specifies which quality standards are to be complied with, how regular inspections are to be carried out and how errors or defects are to be rectified. The QAA is an important part of the quality management process and is intended to guarantee consistently high quality.
Quality specification:
The totality of the presupposed, defined and assessable properties of a product, a system or an activity; the quality of a system is thus determined by the definition of characteristic, measurable or assessable properties.
properties are defined and assessed.
quality system:
Structure and process organization for the implementation of quality management; the English term quality system was translated into German as Qualitätsmanagementsystem.
Quality improvement:
Measures in the established quality assurance system (including the GMP system) that increase confidence in the assurance of product quality; measures taken throughout the organization to increase the effectiveness and efficiency of activities and processes in order to achieve additional benefits for both the organization and its customers.
Reference value:
The value that is represented by a reference measuring device or a reference measuring device and with which the display value of the measuring device to be tested (test item or calibration item) is compared. The reference value is also called the target value, correct value, best estimate, assigned value or agreed value.
Degree of reflection:
The ability of a material/body to reflect infrared radiation; it depends on the surface texture and the type of material/body. This variable can have a value between 0 and 1.
Recalibration:
The calibration certificates issued by calibration laboratories document the condition of the calibration item during calibration.
calibration
. This does not indicate how long the reported values are valid. To ensure that the measured values are still correct in the long term, the
calibration
is repeated at regular intervals. This repetition of the
calibration
is called recalibration.
Repair:
Measure to re-establish the conditions for fulfilling the requirements on a product that does not meet the intended requirements.
Reproducibility:
Repeatability of the results of a procedure, test or activity within specified limits; a measure of reproducibility is the degree of deviation of the results of the repetitions from a reference value (a mean value of the results or a target value) within specified limits around the reference value.
Correct value:
A value recognized by agreement that is assigned to a specific variable under consideration and that is subject to an uncertainty appropriate to the respective purpose;
The value of a variable realized by a reference standard can be regarded as the correct value at a point under consideration.
Raw data:
Data that is generated in the course of a procedure or test and forms the basis for further calculations to determine the final result; raw data is recorded electronically or manually (e.g. in the logbook, laboratory journal or on forms). Raw data from the manufacture and testing of a product falls within the scope of batch documentation.
Traceability/traceability:
Property of a measurement result or the value of a standard to be related to suitable standards, generally international or national standards, through an uninterrupted chain of comparative measurements with specified measurement uncertainties; traceability therefore means relating measurement results to international or national standards through an uninterrupted chain of calibrations.
Freedom from retroactivity:
Ability of a measuring device not to influence the measured variable;
- A scale is non-reactive.
- A resistance thermometer that heats the medium whose temperature it is supposed to measure is not reaction-free.
Secondary standard:
Standard whose value is determined by comparison with a primary standard.
Self-inspection:
Internal quality audit to verify the implementation and effectiveness of the quality assurance system and compliance with the procedural instructions.
Seal mark:
In order to prevent the following from occurring after a calibration
calibration
changes or manipulations are made to the measuring device or that these are then recognized, the measuring device is provided with a seal.
Target value:
The target value is the correct value that is displayed by a reference measuring device or a reference measuring device.
Specification:
Written and measurable or assessable requirements for the properties or functions of an object; objects are: Product, system, equipment, process and activity. Specifications serve as the basis for quality control, validation and maintenance (including cleaning).
Quality assurance ensures that quality control complies with the specifications that serve as the basis for release.
Specification areas:

Stability:
Extent of mutual approximation between results of the same measured variable, carried out at fixed intervals; a measure of stability is the maximum difference between the mean values.
Stability (specification of calibration equipment):
Specification of the parameter over time at a measuring point.
State of the art:
Generally applicable quality requirement for an object (product, process or activity) that corresponds to the current and recognized state of knowledge from science, technology and experience.
transmittance:
The ability of a material/body to transmit infrared radiation; it depends on the strength and type of material/body. This variable can have a value between 0 and 1.
Monitoring:
Accredited calibration laboratories are subject to constant monitoring by the PTB or EA in order to ensure the reliability of the calibrations.
True value:
Value that corresponds to the definition of a specific variable under consideration;
- By their very nature, true values cannot be determined.
- This value would be obtained with an ideal measurement.
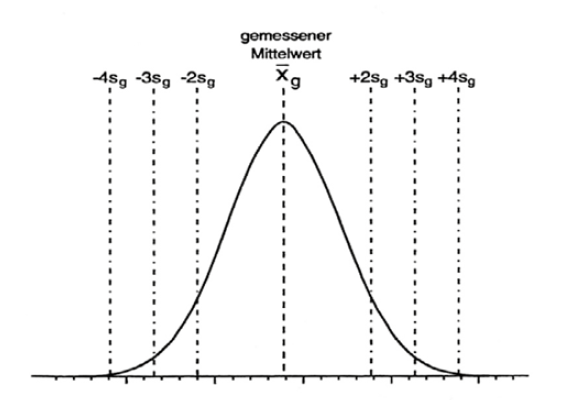
Repeatability:
Repeatability describes the degree of mutual approximation between results of successive measurements (at short time intervals) of the same measurand, performed under the same measurement conditions. One measure of repeatability is the standard deviation (s).
Certificate:
see “DAkkS calibration certificate”, “ISO/factory certificate”, “Calibration certificate”.
Certify:
… is the formal confirmation by a third party that products, processes and services conform (comply) with a specific standard or defined requirements. This confirmation is carried out, for example, by Germanischer Lloyd Certification GmbH.
Certification body:
An institution that carries out certifications.
Certificate of approval:
A calibration laboratory must have sufficient personnel who have the necessary education, training, technical knowledge and experience to fulfill their tasks. The laboratory must ensure that the training of its staff is kept up to date. Information on the qualifications, training and experience of the technical staff must be kept up to date by the laboratory. The competence of the staff is confirmed with a certificate of approval.
Adjustment/adjustment:
Calibration/adjustment is the adjustment to the smallest possible deviation from the correct value. Calibration/adjustment requires intervention on the measuring device.
Deviation/measurement deviation:
Difference between the measurement result and the correct value of the measured variable (measurement result minus correct value); because a true value cannot be determined, a correct value is used in practice.
Accreditation (calibration):
Accreditation is the formal recognition of the competence of a calibration laboratory to carry out certain calibrations in accordance with specified standards (DKD/DAkkS guidelines). This formal determination is made by an authorized body. In Germany, this is the German Accreditation Body in Berlin.
Accreditations according to EN 45001:
EN 45001 is a European standard that defines the quality standards for calibration laboratories. After there were repeated problems in the recognition between calibrations according to EN 45001 and calibrations according to ISO Guide 25, a harmonized standard was created in 1999: DIN EN ISO 17025.
Accreditations according to ISO Guide 25:
ISO Guide 25 is the American standard that defines the quality standards for calibration laboratories (see point A.4 above).
Accreditations according to DIN EN ISO/IEC 17025:
DIN EN ISO/IEC 17025 is a common standard for verifying the competence of testing and calibration laboratories whose calibrations are recognized worldwide. In Germany, this is referred to as DAkkS accreditation, in Switzerland as SCS and in Austria as ÖKD.
Aging:
The ageing is the permitted drift that the measuring device could make until the next calibration. This value is an empirical value that is determined over a longer period of time.
Adjustment time:
The adjustment time is the time that a sensor (probe or sensor element) needs until it has adjusted to the measured variable (e.g. temperature). The adjustment time is the time that test equipment needs to adjust to the specified ambient conditions
(e.g. dimensional test equipment).
Contact pressure:
For example, the contact pressure is the force with which surface sensors are pressed onto the temperature-controlled surface during calibration. A certain amount of pressure should be applied so that there is no air gap between the surface and the contact surface of the sensor.
Another example is the force with which the blades of a caliper are pressed together to take a measurement. The force can vary depending on the user.
Resolution:
Smallest distinguishable difference between two displays of a display device. In the case of a digital display, this is the change in the display where the last significant digit changes by one digit step. Attention: The resolution of a measuring device is not the same as its accuracy! The accuracy of a measuring device is always worse than its resolution.

Measured/display value: 20.7°C
Resolution: 0.1°C
Accuracy: ?
Transducer/transducer/sensor:
Element of a measuring device or measuring chain on which the measured variable acts directly (also sensor, sensor element or transducer), e.g: – Measuring point/sensor of an electrical thermometer
– Impeller of an impeller anemometer
– Float of a liquid level indicator.
Authorized personnel:
Element of a measuring device or measuring chain on which the measured variable acts directly (also sensor, sensor element or transducer), e.g: – Measuring point/sensor of an electrical thermometer
– Impeller of an impeller anemometer
– Float of a liquid level indicator.
Base unit:
Unit of a base size in a size system.
Base size:
One of the quantities of a system of quantities that is considered independent of the other quantities due to an agreement (e.g. length, mass, time…).
Appraisal:
Examination of an object (organization, system, procedure, activity, conditions, material, etc.) to assess its compliance with certain requirements; assessment in the context of accreditation or certification: examinations in the form of an audit and expert opinion regarding the fulfillment of the requirements specified for accreditation.
Condition test/visual inspection:
Before a calibration, check whether everything is in order on the measuring device or measuring system or whether there is any visible damage (e.g. bent sensor due to transportation, damage to the housing/display, broken pointer of a pressure gauge, etc.). If this is the case, the measuring device
or measuring system cannot be calibrated.
Operating resources:
Collective term for personnel and material resources (premises, equipment, auxiliary materials and reagents, consumables, raw materials, containers & accessories, packaging materials & intermediate products) that are used to manufacture and control products.
Reference standard:
Normal, generally of the highest accuracy available at a given location or organization from which measurements are derived.
Reference value/reference value:
The value that is represented by a reference measuring device or a reference measuring device and with which the display value of the measuring device to be tested (test item or calibration item) is compared. The reference value is also called the target value, correct value, best estimate, assigned value or agreed value.
DAkkS calibration certificate:
The term “DAkkS calibration certificate” is used colloquially for the calibration certificate with the accreditation symbol of an accredited calibration.
Calibration certificates with the accreditation symbol represent the highest industrial calibration standard in Germany. They have the highest reliability, are internationally recognized and are binding in court. Calibration certificates with an accreditation symbol are ideal for:
- Factory standards
- the automotive industry (IATF)
- Pharmacy/medical technology
- Experts

Sample of a calibration certificate with accreditation symbol
DCC – digital calibration certificate:
The digital calibration certificate (DCC) is a digital certificate that documents the results of calibrations and was developed by the Physikalisch-Technische Bundesanstalt (PTB) and the German Calibration Service (DKD). It replaces traditional paper-based calibration certificates and offers several advantages, including increased accuracy, efficiency and security. Here is a summary of the most important points:
What is a digital calibration certificate (DCC)?
A DCC is a digital document that contains the measurement results and other relevant information of a calibration. It serves as an official certificate that confirms the accuracy and traceability of measuring devices. PTB and the DKD are working on the standardization and dissemination of the DCC to support the transition from paper-based to digital processes.
Advantages of the DCC
- Automation and efficiency: DCCs enable automated processing and storage of calibration data, which reduces administrative effort and increases efficiency.
- Accuracy and integrity: Digital data transmission and storage minimize the risk of errors and manipulation. Electronic signatures and encryption techniques ensure the authenticity and integrity of the data.
- Environmentally friendly: By dispensing with paper documents, the DCC helps to reduce paper consumption and thus conserve resources.
- Traceability and transparency: DCCs can be easily archived and retrieved when required, improving the traceability of measuring devices and calibration processes.
Technical details and implementation
- Standardization: The PTB and the DKD are developing uniform standards for the DCC to ensure compatibility and acceptance.
- Security measures: The use of electronic signatures and encryption technologies ensures that data is protected against unauthorized access and manipulation.
- Data formats: The DCC uses standardized data formats (such as XML) that enable easy integration into existing IT systems and databases.
Challenges and future prospects
- Acceptance and dissemination: The introduction of the DCC requires acceptance by users and calibration laboratories. Training and information campaigns are necessary to communicate the benefits and use of the DCC.
- Interoperability: Ensuring interoperability between different systems and platforms is a challenge that is being tackled through international cooperation and standardization.
- Technological development: The DCC must be continuously developed to meet the latest technological and regulatory requirements.
Conclusion
The digital calibration certificate (DCC) of the PTB and the DKD represents an important step towards digitalization and automation in the field of measurement technology. It offers numerous advantages in terms of efficiency, accuracy and environmental friendliness, while at the same time having to overcome the challenges of acceptance and interoperability. The ongoing development and standardization of the DCC will have a significant influence on the future of calibration.
German Accreditation Body (DAkkS):
The DAkkS is Germany’s national accreditation body. In accordance with Regulation (EC) No. 765/2008 and the Accreditation Body Act (AkkStelleG), it acts in the public interest as the sole service provider for accreditation in Germany.

DAkkS logo
Tasks of the DAkkS:
The accreditation of conformity assessment bodies (laboratories, inspection and certification bodies) is the legal mandate of DAkkS. With an accreditation, the DAkkS confirms that these bodies fulfill their tasks competently and in accordance with applicable requirements. In short: DAkkS audits the auditors.
Confirming competence, ensuring quality, creating trust: By establishing a national accreditation body, Germany has an accreditation system that is transparent for manufacturers, consumers and conformity assessment bodies. The DAkkS offers accreditations for all areas of conformity assessment from a single source. The accreditation procedure creates confidence in the results of certificates, test reports and inspections and supports their worldwide recognition and comparability. DAkkS thus makes an important contribution to the quality assurance of products and services, to consumer protection and to the competitiveness of the German economy.
German Calibration Service (DKD):
Reorganization since May 2011 as a PTB committee for the development of metrological principles for calibrations.
Tasks and objectives of the DKD:
Ensuring the cooperation of accredited calibration laboratories with PTB, development of calibration guidelines (DKD-R), basis for accreditation procedures and assessments, promotion of the calibration system in the sense of passing on the unit, promotion of the exchange of information between the members.
Digit:
The smallest possible resolution of the actual value of a digital measuring device.
DIN standard:
DIN standards are published by the German Institute for Standardization. They are created in close cooperation between companies, associations and authorities.
DIN standards can have a national, European and international character, which can be recognized by the designations:
DIN + counting number: A DIN + counting number (e.g. DIN 5008) is a national standard.
DIN EN + number: A DIN EN + number (e.g. DIN EN 45001) is the German version of a European standard.
DIN EN ISO + counting number: A DIN EN ISO + counting number (e.g. DIN EN ISO/IEC 17025) is the German edition of a European standard which is identical to an international standard.
IEC stands for International Electronical Commission; international standardization body under private law for standardization in the field of electrical engineering and electronics.
Documentation:
During the
calibration
is the documentation of the measured values during calibration.
calibration
and the creation of the certificate.
Drift:
Slow change of a metrological characteristic of a measuring device.
Oaks:
Verification is the official check for compliance with the verification error limits. Calibration is carried out exclusively by the State Weights and Measures Office. Only those measuring devices that have a type approval are eligible for calibration.
Calibration mark/verification mark:
A calibration mark is affixed to the measuring device and sensor, indicating the period of validity of the calibration. This means that if the “expiry date” is exceeded, the calibration is no longer valid and must be carried out again. The statement of a validity date is available for the
calibration
does not exist! Only a recommendation may be made here (see “Recalibration”).
Calibration certificate:
The verification office documents the period of validity of the test in the verification certificate.

Calibration certificate
This time period is also printed on the calibration mark on the measuring device and sensor.
Suitability test (of a testing laboratory):
Determination of the performance of a testing laboratory, certain
to carry out tests or types of tests.
Suitability test:
The suitability test depends on the type of test characteristics. Necessary prerequisites for the tests are the resolution of the test equipment and its linearity in the measuring range of the test characteristic.
Basically, test equipment is differentiated according to the type of characteristics. There is test equipment for quantitative and qualitative characteristics. While the qualitative characteristics are usually determined using gauges or measuring standards, the quantitative characteristics are determined using indicating test equipment. The characteristics of the features are quantified and compared with quality specifications.
All test equipment for quantitative characteristics obtained through quantitative observations of the measurements can in principle be subjected to the suitability test. Test equipment for quantitative characteristics is divided into two groups:
- Test equipment designed for the measurement of individual characteristics
- Test equipment that records several characteristics simultaneously
Within the groups, a distinction is made between standard test equipment, such as multimeters, which can be used to measure different measuring ranges, and special test equipment, which is usually developed for a specific application or for special characteristics and used accordingly.
Suitability test for a characteristic:

Basic scheme of the suitability test:

Influencesideration:
Quantity that is not a measured variable but influences the measurement result, e.g:
- Temperature of a micrometer for length measurement
- Frequency when measuring the amplitude of an alternating voltage
- Local ambient pressure when measuring flow velocities
Unit:
Specific quantity defined by agreement to which other quantities of the same type are compared in order to express the relationship to this quantity. For units in metrology, names and unit symbols are defined by agreement.
Unit (derived):
Unit of a derived quantity in a system of quantities, e.g:
|
Name of the measured variable |
Unit of the measured variable |
Sign |
|
Power Energy Pressure |
Newton Joule Pascal |
N J Pa |
Unit (multiple):
The multiple of a unit is a larger unit that is formed from a unit by an agreed ratio. A distinction is made between decimal and non-decimal multiples.
a decimal multiple of the meter is the kilometer
a non-decimal multiple of the second is the hour
Unit (part):
The part of a unit is a smaller unit that is formed from a unit by an agreed ratio. A distinction is made between the decimal and the non-decimal part.
a decimal part of the meter is the millimeter
System of units:
Set of base units and derived units that are defined according to predefined rules for a given system of units (SI system of units).
System of units (international), SI system of units:
The system of units adopted and recommended by the General Conference on Weights and Measures (CGPM).
|
||||||||||||||||||||||||||||
Unit symbol:
Agreed symbol that stands for a unit (e.g. “m” for meter, “A” for ampere, “°C” for temperature …).
emissivity:
The ability of a material/body to emit (emit) infrared radiation; this quantity can take a value between 0 and 1.
Sensitivity:
Change in the output variable of a measuring device divided by the corresponding change in the input variable.
European Cooperation for Accreditation of Laboratories (EA):
Today, international coordination in metrology is carried out by numerous committees whose members come from the national coordination centers. These national bodies, often state institutes, then initiate and monitor implementation in their own country. In Europe, for example, the European coorperation for accreditation of laboratories (EA) acts as a link between the national state institutes.
Examples of national state institutions:
The Physikalisch-Technische Bundesanstalt (PTB) is the supreme authority for metrology in Germany.
The central office for the measurement system in Austria is the Federal Office for Economic Affairs (BmwA). The laboratories are accredited by the Austrian Calibration Service (ÖKD).
Switzerland’s national metering system is under the supervision of the Federal Office of Metrology (FOM). All accredited laboratories are members of the Swiss Accreditation Service (SCS).
Sensor:
The sensor (also sensor, sensor element or transducer) is attached/integrated to the sensor itself and is directly affected by the measured variable.
- NTC sensor in the probe for air temperature measurement
- Thermocouple in the cross-band surface sensor
- DMS in the pressure probe
Function test:
As with the quality test, the following is carried out before a
calibration
it is checked whether the measuring device or measuring system is functional (e.g. whether all segments of the digital display are in order, whether the device under test delivers meaningful and comprehensible values after being switched on, etc.). If this is not the case, the measuring device or measuring system cannot be calibrated.
Normal use:
Standard that is routinely used to calibrate or test measuring standards, measuring instruments or reference materials;
A working standard is usually calibrated with the aid of a reference standard;
A working standard that is routinely used to ensure that measurements are carried out correctly is called a test standard.
Accuracy:
Ability of a measuring device to deliver values of the output variable close to the correct value; accuracy is the same as measurement uncertainty; only formulated positively. The term accuracy is used in the manufacturer’s specifications of the measuring devices. This “positive” term is also necessary and understandable from an advertising point of view. For calibration results, however, the “negative” term measurement uncertainty is used.
Accuracy class:
Measuring device class that fulfills metrological requirements according to which measurement deviations should remain within defined limits.
Device specification:
The detailed technical data and descriptions of a specific device; this includes the construction plans, parts lists with manufacturer specifications, functional descriptions, performance specifications, maintenance specifications,
calibration
repair, etc. A current device specification is an integral part of the device.
Limit conditions:
Extreme conditions which a measuring instrument must withstand without damage and without deterioration of its specified metrological characteristics in a subsequent application under operating conditions;
The limiting conditions for storage, transportation and operation may vary.
Limit conditions can include limit values for the measured variable and for the influencing variables.
Guide to the Expression of Uncertainty in Measurement (GUM):
The “GUM” is a guideline for specifying measurement uncertainties when measuring, which was adopted in 1993. This guide can be obtained from DIN. Various institutions have derived simplified and procedure-oriented guidelines from this. For example, the EA-R2 has published the German translation of the DKD-3 (specification of measurement uncertainty for calibrations) from 1998.
History:
By regularly calibrating a measuring device, you can see from the individual certificates how the values have changed in the past.
Homogeneity:
Specification of the parameter via the spatial distribution in the calibration device
Hysteresis:
The hysteresis is relevant for pressure calibrations of electrical and mechanical pressure measuring systems. It is calculated from the results of the measurements with rising and falling pressure, from the difference between the displayed values. This difference is included in the measurement uncertainty analysis.

Identification:
In order to prevent confusion and to provide proof that the
calibration
calibration, a test equipment must be
calibration
clearly identified after calibration. This means that the device and sensor are given a calibration mark with a unique number and the date of calibration.
calibration
. This number and the date can then be found on all sheets of the corresponding certificate.
Identification also includes the clear marking of faulty measuring and test equipment as well as the marking of test aids.
Instability:
The instability expresses the measurement uncertainty of the test specimen during calibration. It is part of the total measurement uncertainty stated in the certificate.
International Laboratory Accreditation Cooperation (ILAC):
The main objective of the ILAC is to create a worldwide network of agreements for the mutual recognition of calibration and test certificates of accredited laboratories. This supports the work of relevant regional organizations (e.g. the EA). The first step in this direction is the common accreditation basis DIN EN ISO/IEC 17025.

ILAC logo
International standard:
Standard that is recognized by an international agreement as the basis for determining the values of all other standards of the quantity in question.
ISO/factory calibration certificate:
The quality assurance systems of industrial companies have been certified in accordance with DIN ISO 9000ff since 1987. There are also other industry-specific quality guidelines.
The introduction and maintenance of test equipment calibration and monitoring is required for all directives and standards.
In many cases, ISO calibrations that meet the requirements of the various standards and are traceable to national standards are sufficient. ISO certificates are then issued for these calibrations.

ISO certificate
ISO stands for:
International Organization for Standardization
Actual value:
The value of a measured variable displayed by the calibration item; it usually differs – due to measurement errors – from the correct value (see also target value), which is represented by a reference measuring device or a reference measuring device.
Calibration instructions:
Instructions describing exactly how and with which tools the calibration is to be carried out for employees who carry out the calibrations.

Date on the calibration mark
Calibration date:
Since, in contrast to calibration, there is no expiration date for calibration, the date on which the calibration was carried out is noted for each calibration (on the calibration mark for the measuring device/sensor, information in the calibration certificate).
It is not permitted to specify when the next calibration is due. Only a recommendation may be made in the accompanying letter. The frequency of the calibrations and the intervals between them are defined by the user (see also Calibration interval).
Calibration device:
In order to be able to carry out calibrations, you need various auxiliary measuring devices and equipment that provide the defined values (the correct values) on which you want to calibrate a measuring device (e.g. liquid basin for temperature calibration).

Calibrate:
Calibration is the comparison of a measured value with the correct value under specified conditions, the documentation of the deviation, the calculation of the measurement uncertainty and the creation of the certificate.
Calibration result:
The data collected during
calibration
The values documented during calibration and the values calculated from them (mean value, deviation, measurement uncertainty) are the main component of the calibration result and are documented in the certificate. A complete calibration result consists of reference value, actual value, deviation, tolerance and measurement uncertainty.
Calibration capability:
Before calibration, quality, visual and functional tests are carried out on the measuring devices to be calibrated.
calibration
the calibration capability is determined. If these tests reveal that something is wrong, the meter must not be calibrated. It is therefore not calibratable.
Calibration item/ test item:
Measuring device/equipment, sensor or measuring system that is to be calibrated (often also called test item).
Calibration interval/monitoring interval:
In order to achieve permanently correct measurements and to gain confidence in the test equipment required for this, it must be calibrated at regular intervals. These intervals from one calibration to the next are called calibration intervals or monitoring intervals. The length of this period can be determined individually by the user and depends, among other things, on
- Recommendation of calibration laboratories (normally “annually”)
- Specifications of the measuring device manufacturer
- required measurement uncertainties
- Specifications of standards and guidelines
- Specifications from third parties
- Operating conditions of the test equipment
- Frequency of use
The following procedure can be used to determine the calibration interval:

Calibration laboratory:
Laboratory that performs calibrations; this can be an external laboratory (e.g. calibration service provider) or an internal department within the company.
Calibration management:
Calibration management describes – within the life cycle of a measuring point – all measures for organization, risk management and cost control. All elements of calibration management are categorized into project phase, operating phase or common elements. Calibration management thus describes the holistic approach to organizing metrological instrumentation from a risk-based perspective.
Calibration mark:
Unique identification of a measuring device and its sensors after
calibration
The mark indicates (by stating the calibration date) when the last calibration was carried out.
calibration
took place.
In addition, the device and the sensor are given a unique number (which is also noted on the calibration mark) in order to clearly identify the measuring system and establish a clear connection to the correct certificate.


Examples of calibration marks
Calibration certificate:
The accredited calibration of a test device is documented in the calibration certificate. For this purpose, the device and sensor data as well as the data collected during the
calibration
measured values are recorded. It is also listed which laboratory
calibration
performed, which facilities,
procedures and reference devices were used and which environmental conditions were used for the
calibration
prevailed during calibration.
The calibration certificates issued by calibration laboratories document the condition of the calibration item during calibration.
calibration
. This does not indicate how long the documented measured values are valid. In order to be sure in the long term that the measured values are still correct and that the measuring device is still measuring correctly, the
calibration
must be repeated frequently enough (see also “Recalibration”).
Calibration procedure:
There are different methods for different measured variables to calibrate the
calibration
calibration. The calibration procedure depends on various factors (e.g. parameters, equipment, measurement uncertainty, etc.). The corresponding procedure with which the
calibration
was carried out is specified in the certificate.
Calibration value:
A complete calibration or measured value consists of several components: The reference value, the display value, the deviation and the measurement uncertainty:

Reference value

Display value
-0.2 k ±0.3 k
Deviation and measurement uncertainty
Calibration certificate:
The calibration certificate documents the ISO/factory calibration of a test device. For this purpose, the device and sensor data as well as the data collected during the
calibration
measured values are recorded. It is also listed which laboratory
calibration
calibration, what equipment, procedures and reference devices were used and what environmental conditions were used for the calibration.
calibration
prevailed during the calibration.
The calibration certificates issued by calibration laboratories document the condition of the calibration item during calibration.
calibration
. This does not indicate how long the documented measured values are valid.

ISO calibration certificate
In order to be sure in the long term that the measured values are still correct and that the measuring device is still measuring correctly, the
calibration
must be repeated frequently enough (see also “Recalibration”).
Conformity/ Compliant with standards:
Fulfillment of specified standards and requirements; fulfills a
calibration
the requirement of a specific standard, the
calibration
or the resulting calibration certificate conforms to this standard.
Declaration of Conformity:
The declaration of conformity is a written confirmation at the end of a conformity assessment, with which the person responsible (e.g. manufacturer, distributor) for a product, the provision of a service or an organization (e.g. testing laboratory, operator of a quality management system) bindingly declares and confirms that the object (product, service, body, QMS) has the properties specified on the declaration. The properties are usually specified by specifying the standards that the object complies with.
Correction:
Value added algebraically to the uncorrected measurement result to compensate for the systematic measurement deviation. The correction is equal to the estimated systematic error of measurement with the opposite sign.
Correction factor:
Numerical factor by which the uncorrected measurement result is multiplied to compensate for the systematic measurement deviation.
Measurement scale:
Device with which one or more values of a quantity are to be reproduced or supplied in a constant manner during its use, e.g:
- Weight piece
- Normal resistance
- gauge block
Measurement deviation (systematic):
Mean value that would result from an unlimited number of measurements of the same measurand performed under repeatability conditions, minus one correct value of the measurand;
- Systematic measurement deviation is equal to measurement deviation minus random measurement deviation;
- Like the correct value, the systematic measurement deviation and its causes cannot be fully known.
Measurement deviation (random):
Measurement result minus the mean value that would result from an unlimited number of measurements of the same measurand carried out under repeat conditions;
- Random measurement deviation is equal to measurement deviation minus systematic measurement deviation;
- Because only a finite number of measurements can be carried out, only an estimate of the random measurement deviation can be determined.
Measurable size:
Property of a phenomenon, a body or a substance that can be described qualitatively and determined quantitatively; the term quantity can refer to a quantity in the general sense (length, time, mass, temperature, pressure, electrical resistance …), or to a specific quantity (length of a given rod, temperature of a given surface, electrical resistance of a given wire …). Quantities that can be ordered in relation to each other are called quantities of the same type. The formula symbols for sizes are defined in ISO 31.
Measuring range:
Value range of the measured variable for which the measurement deviations of a measuring device should lie within specified limits; the measurement deviation of a measuring device is determined in practice with reference to a correct value.
Measurement stability:
Ability of a measuring device to maintain its metrological properties unchanged over time.
Measuring device:
Complete set of measuring devices and other equipment assembled to perform specified measurements.
Measurement result:
Value assigned to a measurand and determined by measurements; it should be made clear what the measurement result refers to:
- the display
- the uncorrected measurement result
- the corrected measurement result
– and whether several values were determined. A complete specification of the measurement result contains information about the measurement uncertainty!
Measurement result (corrected):
Measurement result after correction for systematic measurement deviation.
Measurement result (uncorrected):
Measurement result before correction for systematic measurement deviation.
Measurement accuracy:
Extent of agreement between the measurement result and a correct value of the measured variable; accuracy is a qualitative term. The word “precision” should not be used for “accuracy”.
Measuring device:
Device to be used alone or in conjunction with additional equipment for measurements.
Measured variable:
Special quantity that is the subject of a measurement; the specification of a measured quantity may require information on quantities such as time, temperature and pressure.
Measured variable (derived):
A quantity defined in a system of quantities as a function of the basic quantities of this system; in a system with the basic quantities length and time, speed is a derived quantity, defined as length divided by time.
Measuring chain:
Sequence of elements of a measuring device or a measuring system that forms the path of the measurement signal from input to output.
Measurement method:
General description of the logical sequence of actions for carrying out measurements;
- Substitution method
- Differential measurement method
- Zero adjustment
Measuring equipment:
All measuring devices, standards, reference materials and aids required to carry out a measurement.
Measuring principle:
Scientific basis of a measurement method, e.g:
- the thermoelectric effect, applied to temperature measurements
- the Josephson effect, applied to measurements of electrical voltage
- the Doppler effect, applied to speed measurements
Measurement signal:
Quantity that represents the measured variable and to which it is linked by a function, e.g:
- the electrical output signal of a pressure transducer
- the frequency of a voltage-frequency converter
Transmitter:
Device that provides an output variable according to a fixed relationship to an input variable.
Measurement:
The entirety of activities for determining a quantity value; the activities can run automatically.
Measurement uncertainty:
Parameter assigned to the result that characterizes the scatter of the values that can be assigned to the measurand; or:
The estimated value for characterizing a value range within which the true value of the measured variable lies; there are many factors that influence the measurement uncertainty.
It is assumed that the measurement result is the best estimate of the value of the measurand and that all components of uncertainty contribute to the scatter, including those that are affected by systematic effects.
e.g. those originating from corrections and reference standards.
Measuring method:
The entirety of precisely described activities as they are applied when carrying out special measurements in accordance with a specified measurement method. It is common to write down a measurement procedure in a document called a measurement instruction, measurement rule or measurement procedure, which usually contains sufficient detail to enable the user to perform the measurement without further information.
Metrology:
The “Dart Game Declaration”:

You will never always hit the exact center when playing darts. Every now and then an arrow hits the bull’s-eye, but often you also hit the outside of the target. The darts that did not hit the bull’s eye then reflect the uncertainty of the thrower or the uncertainty of the dart player. The measurement uncertainty is influenced by the calibration item, the measuring equipment, the persons, the measuring method and the ambient conditions.
The science of measurement; metrology encompasses both the theoretical and practical aspects of measurements, regardless of the respective measurement uncertainty and regardless of the respective field of science and technology.
National standard:
Standard that is recognized in a country by national resolution as the basis for determining the values of all other standards of the size in question.
Nonlinearity:
The non-linearity is the deviation of the sensor’s output signal from a theoretical straight line that has been adjusted to the data points of an effective calibration. It represents the maximum deviation of all data points of a
effective calibration and is expressed as a percentage of the full output signal.
Normal/ Reference:
Measuring standard, measuring instrument, reference material or measuring device for the purpose of determining, embodying, preserving or reproducing a unit or one or more quantity values, e.g:
- 1 kg mass standard
- 100 Ohm resistance standard
- Caesium atomic clock
- Thread standard
Physikalisch-Technische Bundesanstalt (PTB):
The Physikalisch-Technische Bundesanstalt, Braunschweig and Berlin, is a scientific and engineering state institute and technical authority of the Federal Republic of Germany for metrology and physical safety engineering. PTB is part of the German Ministry of Economic Affairs.

Precision:
Statistical variable that describes the mean and random deviation of values obtained from multiple and uninterrupted repetitions of a measurement. For example, the statistical dispersion or standard deviation is used as a statistical variable. The precision gives an indication of random result uncertainties.
Primary laboratory:
The primary laboratory is the laboratory that works with standards of the highest quality and lowest measurement uncertainty. It refers to the highest traceability level.

Primary normal:
Standard which, according to general judgment, meets the highest metrological requirements, with a magnitude value which is accepted independently of those of other standards for the same quantity.
Test equipment:
The measuring equipment used to check compliance with a quality requirement after the measuring process. The combination of measuring and testing for compliance with a quality requirement turns measuring equipment into testing equipment.

Test equipment, test process suitability/test equipment capability:
The result of the test is always subject to measurement uncertainty. According to the standards of the ISO 9000 family, the user of test processes must define the measurements to be performed and the required accuracy and select the test equipment that is suitable with regard to the required accuracy and measurement uncertainty.
In order to be able to assess suitability, the user must know the quality requirement (e.g. the tolerance), because a test process is suitable for quality testing if its measurement uncertainty is sufficiently small compared to the quality requirement. The ratio of measurement uncertainty to quality requirements is important wherever products or processes are qualified on the basis of individual characteristic values.
The measurement result is the symmetrical interval of the expanded measurement uncertainty. When comparing the measurement result with the specification limits, three ranges emerge:
- Range of conformity: Specification range reduced by the expanded measurement uncertainty
- Non-conformance range: Range outside the specification range extended by the expanded measurement uncertainty U
- Uncertainty range: range close to the specification limits for which neither agreement nor disagreement can be demonstrated, taking into account the expanded measurement uncertainty
Test equipment management/ test equipment management:
Test equipment management (also known as test equipment management, PMV) is part of quality management. It aims to ensure and maintain the quality, reliability, operational capability and readiness of a company’s test equipment. Monitoring should enable test equipment to provide the required performance at all times. Test equipment management is therefore a method for increasing process capability.
Quality:
- Quality is the totality of characteristics of a unit or a definable object with regard to its suitability to fulfill specified and presupposed requirements.
- Complete set of fulfilled requirements for characteristics of a unit.
- Realized condition of a unit with regard to quality requirements.
Definition 1 implies that the non-presupposed and non-specified properties have no further meaning as quality criteria. However, non-presupposed requirements can also determine quality.
Quality audit:
Regularly recurring, systematic and independent examination to determine whether the quality-related activities and related results meet the planned requirements and whether these activities are actually carried out and are suitable for achieving these objectives.
Quality management:
Management related to quality; coordinated activities for leading and directing an organization with regard to quality; quality management thus represents all activities of overall management that define the quality policy, objectives and responsibilities within the framework of the quality management system and implement these through means such as quality planning, quality control, quality assurance and quality improvement (see quality assurance according to ISO 9000 ff).
Quality management requires a system of operational management (organization and leadership, procedures, resources; quality management system) in order to implement the quality policy and fulfil the tasks of quality assurance and is superordinate to the organizational system of quality assurance.
quality management system:
Management system for guiding and directing an organization with regard to quality; management system: organizational structure, procedures, processes and means for defining and implementing the quality policy, the quality objectives and for achieving these objectives.
Quality plan:
Plan that defines the objectives for improvement as a result of the quality requirements and the organizational and operational plan for achieving these objectives; specification for the quality elements to be applied in the specified case.
Quality planning:
Part of quality management that focuses on defining the quality objectives and the necessary execution processes, as well as the associated resources to fulfill the quality objectives.
Quality policy:
An organization’s overarching intentions and direction on quality as formally expressed by top management.
Quality assurance:
The part of quality management and the quality management system that is aimed at creating confidence that quality requirements are and will be met; definition ISO 9000: All planned and systematic activities that are implemented within the quality management system and that are presented as necessary to create sufficient confidence that a unit will meet the quality requirements (unit: that which can be described and considered individually).
Goal of quality assurance:
The overriding objective of quality assurance is therefore to fulfill preventive and control measures to ensure that products and services are created in such a way that they are suitable for their intended use. Furthermore, that they meet the framework of the specified requirements in all respects and do not expose consumers to any risk due to questionable or inadequate quality or efficacy. This is particularly true for products in the healthcare industry.
Quality assurance thus describes the system of planned activities for planning, controlling and monitoring to fulfill customer requirements. This system must be organized and implemented in such a way that the requirements are met with a sufficient degree of confidence.
Confidence-building measures are thus put in place.
These activities are based on the intentions and objectives with regard to fulfilling the requirements.
Quality assurance therefore comprises all those planned and systematic measures that are necessary to ensure adequate confidence that a product or service meets the quality requirements. The presentation, for example, is a confidence-building measure.
Quality Assurance Agreement (QAA)
A quality assurance agreement (QAA) is a document that is agreed between two parties (e.g. customer and supplier) and defines the requirements for the quality of a product or service. The QAA specifies which quality standards are to be complied with, how regular inspections are to be carried out and how errors or defects are to be rectified. The QAA is an important part of the quality management process and is intended to guarantee consistently high quality.
quality assurance system:
A comprehensively planned and correctly implemented quality assurance system based on the quality policy and quality management of the company management; this system should be fully documented and its functionality monitored by the persons responsible for quality assurance.
Quality specification:
The totality of the presupposed, defined and assessable properties of a product, a system or an activity; the quality of a system is thus determined by the definition of characteristic, measurable or assessable properties.
properties are defined and assessed.
quality system:
Structure and process organization for the implementation of quality management; the English term quality system was translated into German as Qualitätsmanagementsystem.
Quality improvement:
Measures in the established quality assurance system (including the GMP system) that increase confidence in the assurance of product quality; measures taken throughout the organization to increase the effectiveness and efficiency of activities and processes in order to achieve additional benefits for both the organization and its customers.
Reference value:
The value that is represented by a reference measuring device or a reference measuring device and with which the display value of the measuring device to be tested (test item or calibration item) is compared. The reference value is also called the target value, correct value, best estimate, assigned value or agreed value.
Degree of reflection:
The ability of a material/body to reflect infrared radiation; it depends on the surface texture and the type of material/body. This variable can have a value between 0 and 1.
Recalibration:
The calibration certificates issued by calibration laboratories document the condition of the calibration item during calibration.
calibration
. This does not indicate how long the reported values are valid. To ensure that the measured values are still correct in the long term, the
calibration
is repeated at regular intervals. This repetition of the
calibration
is called recalibration.
Repair:
Measure to re-establish the conditions for fulfilling the requirements on a product that does not meet the intended requirements.
Reproducibility:
Repeatability of the results of a procedure, test or activity within specified limits; a measure of reproducibility is the degree of deviation of the results of the repetitions from a reference value (a mean value of the results or a target value) within specified limits around the reference value.
Correct value:
A value recognized by agreement that is assigned to a specific variable under consideration and that is subject to an uncertainty appropriate to the respective purpose;
The value of a variable realized by a reference standard can be regarded as the correct value at a point under consideration.
Raw data:
Data that is generated in the course of a procedure or test and forms the basis for further calculations to determine the final result; raw data is recorded electronically or manually (e.g. in the logbook, laboratory journal or on forms). Raw data from the manufacture and testing of a product falls within the scope of batch documentation.
Traceability/traceability:
Property of a measurement result or the value of a standard to be related to suitable standards, generally international or national standards, through an uninterrupted chain of comparative measurements with specified measurement uncertainties; traceability therefore means relating measurement results to international or national standards through an uninterrupted chain of calibrations.
Freedom from retroactivity:
Ability of a measuring device not to influence the measured variable;
- A scale is non-reactive.
- A resistance thermometer that heats the medium whose temperature it is supposed to measure is not reaction-free.
Secondary standard:
Standard whose value is determined by comparison with a primary standard.
Self-inspection:
Internal quality audit to verify the implementation and effectiveness of the quality assurance system and compliance with the procedural instructions.
Seal mark:
In order to prevent the following from occurring after a calibration
calibration
changes or manipulations are made to the measuring device or that these are then recognized, the measuring device is provided with a seal.
Target value:
The target value is the correct value that is displayed by a reference measuring device or a reference measuring device.
Specification:
Written and measurable or assessable requirements for the properties or functions of an object; objects are: Product, system, equipment, process and activity. Specifications serve as the basis for quality control, validation and maintenance (including cleaning).
Quality assurance ensures that quality control complies with the specifications that serve as the basis for release.
Specification areas:

Stability:
Extent of mutual approximation between results of the same measured variable, carried out at fixed intervals; a measure of stability is the maximum difference between the mean values.
Stability (specification of calibration equipment):
Specification of the parameter over time at a measuring point.
State of the art:
Generally applicable quality requirement for an object (product, process or activity) that corresponds to the current and recognized state of knowledge from science, technology and experience.
transmittance:
The ability of a material/body to transmit infrared radiation; it depends on the strength and type of material/body. This variable can have a value between 0 and 1.
Monitoring:
Accredited calibration laboratories are subject to constant monitoring by the PTB or EA in order to ensure the reliability of the calibrations.
True value:
Value that corresponds to the definition of a specific variable under consideration;
- By their very nature, true values cannot be determined.
- This value would be obtained with an ideal measurement.
Repeatability:
Repeatability describes the degree of mutual approximation between results of successive measurements (at short time intervals) of the same measurand, performed under the same measurement conditions. One measure of repeatability is the standard deviation (s).

Certificate:
see “DAkkS calibration certificate”, “ISO/factory certificate”, “Calibration certificate”.
Certify:
… is the formal confirmation by a third party that products, processes and services conform (comply) with a specific standard or defined requirements. This confirmation is carried out, for example, by Germanischer Lloyd Certification GmbH.
Certification body:
An institution that carries out certifications.
Certificate of approval:
A calibration laboratory must have sufficient personnel who have the necessary education, training, technical knowledge and experience to fulfill their tasks. The laboratory must ensure that the training of its staff is kept up to date. Information on the qualifications, training and experience of the technical staff must be kept up to date by the laboratory. The competence of the staff is confirmed with a certificate of approval.
Source reference: Brinkmann, Burghart; DIN (ed.): Internationales Wörterbuch der Metrologie, 4th edition. Beuth-Verlag, 2012. Quality Management in Industry and Services, Yearbook, Hanser-Verlag, 2000/2001
- Im Drachenacker 7a, 77656 Offenburg
- (+49) 781 125589-0
- info@qmk-gmbh.de
- Mon - Fri, 8:00 am - 3:30 pm
Send calibration request now
QMK GmbH
